
An Easy to Make Halloween Wreath for the Front Door
How to make a your very own Halloween/Autumn inspired door wreath for your home.
My favourite thing about celebrating different seasons is creating beautifully designed homeware pieces to match that season.
This year I set my sights on a Halloween/Autumn inspired door wreath.
Whether it’s for St Patrick’s Day, Easter, Halloween or Christmas, I love popping into my local craft store to see what’s NEW and to help me feel inspired about the season to create stunning new pieces for the home.
This can range from candle holders (or candles), decorative boxes, wreaths, photo frames – there is seriously no end to the amount of creative inspirations you can find in a craft store. Or if you’re lacking the idea, a simple pinterest search will pull up loads of great crafty ideas to help you get inspired for the season.
Although I didn’t make anything fro St Patrick’s this year. I did make a beautiful Candle motive for Easter (which you all loved – thanks for that, the feedback was wonderful). So, this time I decided to make a beautiful Halloween/Autumn inspired door wreath; which if you know me well, you will know Halloween is my favourite season (next to Christmas of course).
This wreath is simple as it’s mostly just decorating an already made wreath base (don’t worry, I don’t expect you to go out and actually weave your own wreath – but hey, if you’re feeling like you might want to weave your own, go for it).

In Australia, our main go to craft store is Spotlight. They are pretty massive and loaded with a wide-range of great craft products to help you create wonderful pieces of art for your home. This wreath cost me just under $50; which I was pretty happy with, considering many already created ones online had a starting price of $70 and up. And of course, being made by my own hand, this wreath is far more personal and rewarding than a store bought one.
What you’ll need (but entirely up to you, depending on what captures your eye):
- 1 x wreath (I chose a nice rustic one woven with willow for a soft Autumn look).
- 1 x string of lights (I found these cute little wire based Halloween designed one, with little pumpkins – very cute)
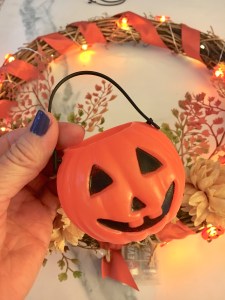
- Pumpkin decorations (I struggled to find the right one, so opted to use the Trick Or Treat Jack-O-Lantern styled plastic buckets).
- Assorted artificial Autumn coloured flowers and leaves (as we are in the middle of an Aussie spring, I did struggle to find Autumn inspired flowers and leaves, so opted for anything which looked dried out and kept to the Autumn colours of red, gold, brown, yellow and orange).
- Rustic orange coloured ribbon (feel free to chose another colour if you please).
- Rustic coloured tassles (I opted to do something different other than a giant bow at the bottom of my wreath, as I was hanging the pumpkins and didn’t think a bow would suit. So opted to use some rustic coloured tassles instead. However, if you prefer to use a bow, then make sure you purchase some extra ribbon.
- A ball of twine (hot glue optional – depending on what design you go for).

First you want to wrap your lights around the wreath. Now, depending on how you want to access the battery part of the light, I attached mine in a position with twine, so I could access the one and off switch easily enough and replace batteries when needed. However if you’re planning on having a big ribbon bow and some additional features hanging from the wreath; more than I have on mine, then you could probably just have the battery part of the lights hanging from the bottom of the wreath. Up to you.
Here’s how I tied mine on and how I wrapped the lights around the wreath:


Next you want to wrap your ribbon around the wreath. Fold the ribbon in half so each end is even and then start with the middle of the ribbon at the top of the wreath and wrap the ribbon evenly on each side. This ensures you don’t run short of the ribbon whilst wrapping and allows for even distribution of the ribbon too.


Now you’re ready to add in the leaves and flowers you chose. As mine were all on wires stalks, I used pliers to cut them to my desired length. Just make sure not to make them too short, or you may need to use some hot glue to keep them in place. I chose to weave the stalks of the flowers and leaves into the wreath, in case in the future, I want to change the look of the wreath, I can just pull them out and replace with something else – up to you.


With the pumpkins, depending on the types you have purchased you can either attach them with some twine, or hot glue them onto your wreath. I wanted to hang my pumpkins, as I thought I would look cute having them wavering in the breeze. So I took out the already existing plastic handles on the mini pumpkin buckets and replaces with twine, so I could tie to the bottom of the wreath.


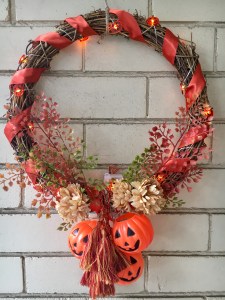
Once the pumpkins have been attached, you’re ready to either tie up a giant bow with your favoured ribbon, or if you opted for the tassles like me, then you attach the tassles at the bottom to swing softly with the pumpkins.


Viola – you have now completed you own DIY Halloween/Autumn Door Wreath and isn’t it cute. I’m obsessing over mine hehe. I decided on a variety of orange and red tones to complete the Halloween season and also to tie in the bright orange of the swinging plastic pumpkins on the bottom. But you could really design your own theme and use whatever colours you like.
Another idea might be to spray paint the wreath black and go with a witches theme (which I may do next year), as you can but some pretty cool witch themed Halloween features. You could mix it up with lime green ribbon and hang little witches cauldrons from the bottom; and use bright white or green lights (if you could find them) – wouldn’t that look brilliant.


Have you made your own door wreath?
I’d love to see how yours turned out.
Email me a pic, or share & tag to my Instagram @travelbugofficial
travelbugofficial
I am a freelance writer and content creator who designs website and manages social media. I also write travel and beauty for www.renaesworld.com.au, and a weekly beauty column for www.bondibeauty.com.au whilst managing my own personal travel and lifestyle blog at www.my-life-journal.com


You May Also Like

Gluten-free Pumpkin Spiced Pancakes Recipe

7 Spooky Things to do This Halloween
